Drywall Mudding in Richmond, BC
Flawless walls start with expert mudding. At Ironwood Drywall Richmond, we specialize in professional drywall mudding services that transform rough installations into perfectly smooth, paint-ready surfaces. Serving residential and commercial clients across Richmond, BC, our team brings precision, experience, and top-quality materials to every project.
Whether it’s a full drywall installation, a seamless repair, or a premium Level 5 finish, our mudding process ensures invisible joints, smooth corners, and durable results that stand the test of time. Each layer of compound is applied and feathered with care, followed by thorough sanding for a consistent surface that enhances the look of any interior.
From humidity-sensitive homes to high-end renovations, Ironwood Drywall Richmond tailors every project to local conditions and your specific finish goals.
Call 778-400-1950 today to schedule your drywall mudding consultation or request a free quote from Richmond’s trusted drywall finishing professionals.

Ironwood Drywall Richmond
The Drywall Mudding Process in Richmond, BC
The drywall mudding process in Richmond involves systematic application of joint compound through multiple coats, proper taping techniques for seams and corners, and specialized methods adapted to local building standards and climate conditions.
Drywall Taping and Mudding Techniques
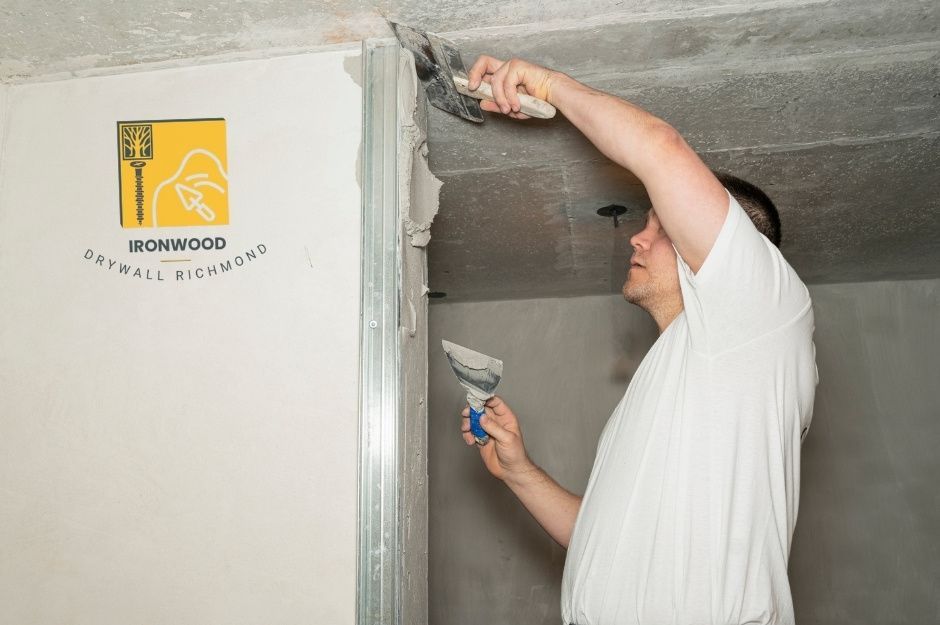
Your drywall installation requires proper taping before mudding begins. Professional drywall tapers start by applying paper or mesh tape to all seams between drywall panels.
The first coat covers the tape with a thin layer of joint compound. You need to press firmly to eliminate air bubbles and ensure proper adhesion.
Second coat application extends 6-8 inches beyond the first coat edges. This creates a gradual transition that prevents visible ridges.
The final coat spans 10-12 inches wide for standard seams. Experienced drywall tapers feather the edges to create seamless blending with the surrounding surface.
Drying time between coats:
- First coat: 24 hours
- Second coat: 24 hours
- Final coat: 24-48 hours
Richmond's humidity levels can extend these drying times during winter months. Professional residential drywall contractors adjust their schedules accordingly.
Applying Drywall Joint Compound
Your joint compound application determines the final surface quality. Pre-mixed compounds work best for most residential drywall projects in Richmond.
Application tools include:
- 6-inch knife for first coat
- 10-inch knife for second coat
- 12-inch knife for final coat
Apply compound in thin, even layers. Thick applications create longer drying times and potential cracking issues.
Work systematically from top to bottom on each wall. This prevents compound drips from affecting finished areas below.
Temperature considerations matter significantly in Richmond. Maintain room temperature between 55-70°F during application and drying.
Your compound consistency should spread smoothly without dragging. Add small amounts of water if the mixture becomes too thick.
Sand lightly between coats using 120-grit sandpaper. This removes ridges and imperfections before the next application.
Drywall Seam and Corner Mudding
Seam finishing requires different techniques than corner work. Flat seams use paper tape for strongest bonds in residential drywall applications.
Apply a thin base coat of compound along the seam. Press tape into the compound using your 6-inch knife.
Corner mudding uses two methods:
- Paper tape folded at 90 degrees
- Metal corner beads for outside corners
Inside corners need careful attention to prevent cracking. Apply compound to both sides of the corner before positioning tape.
Outside corners with metal beads require three coats minimum. The first coat covers the bead flanges completely.
Your second corner coat extends 8 inches from each side. The final coat blends seamlessly into the wall surface.
Drywall installation and repair projects often involve patching existing corners. Match the existing texture pattern for invisible repairs.
Special Considerations for Local Buildings
Richmond's coastal climate affects drywall mudding timelines. Higher humidity during fall and winter months extends drying periods significantly.
Older buildings may have settling issues. Use mesh tape instead of paper tape in areas prone to minor movement.
Local building code requirements:
- Fire-rated assemblies need specific compound types
- Moisture-resistant areas require specialized products
- Sound-rated walls need continuous compound coverage
Your ventilation during mudding prevents moisture buildup. Open windows or use fans when weather permits.
Seismic considerations in Richmond require flexible joints. Avoid over-tightening screws during drywall installation to allow natural movement.
Temperature fluctuations between day and night can cause expansion issues. Schedule mudding during stable weather periods when possible.
Professional drywall installation and repair services understand these local factors. Contact Ironwood Drywall Richmond at 778-400-1950 for projects requiring specialized knowledge.
Achieving Flawless Drywall Finishing
Professional drywall finishing requires precise sanding techniques, proper surface preparation, and careful attention to coating applications. The final appearance of your walls depends on methodical blending, appropriate texture selection, and systematic application of multiple finish layers.
Drywall Sanding for Smooth Surfaces
Proper sanding creates the foundation for professional drywall finishing. You must sand between each coat of joint compound to eliminate ridges and imperfections.
Start with 120-grit sandpaper for initial smoothing after the first coat dries completely. Focus on high spots and raised areas where the compound built up excessively.
Progress to 220-grit sandpaper for final sanding before priming. This finer grit removes scratches from coarser paper and creates an even surface texture.
Essential Sanding Steps:
- Remove loose compound with a putty knife before sanding
- Use circular motions to avoid creating grooves
- Clean dust between grits with a tack cloth
- Inspect under bright lighting to identify missed spots
Sand lightly to avoid damaging the paper face of the drywall. Excessive sanding can create depressions that require additional compound application.
Drywall Level 5 Finish and Coating
Level 5 finish represents the highest standard in drywall surface preparation. This finish requires a thin skim coat of compound over the entire wall surface.
Apply the skim coat using a 12-inch or wider knife in smooth, overlapping strokes. The compound layer should be approximately 1/32 inch thick across the entire surface.
Allow the skim coat to dry for 24 hours before sanding with 220-grit paper. This creates a uniform surface texture that eliminates joint photographing under paint.
Level 5 Applications:
- Glossy or semi-gloss paint finishes
- Critical lighting conditions
- Smooth-textured paint applications
- High-end residential projects
Professional drywall contractors recommend Level 5 finish when surface imperfections cannot be concealed by paint texture alone.
Blending and Surface Preparation
Successful blending eliminates visible transitions between joint compound and drywall paper. You must feather compound edges gradually to create seamless joints.
Use progressively wider knives for each coat application. Start with a 6-inch knife for embedding tape, then use 10-inch and 12-inch knives for subsequent coats.
Apply compound in thin layers rather than attempting to fill imperfections with single thick applications. Multiple thin coats provide better adhesion and smoother results.
Blending Techniques:
- Maintain consistent pressure across the knife blade
- Work from the center of joints outward
- Keep a wet edge to avoid lap marks
- Remove excess compound immediately
Check your work with a bright work light positioned parallel to the wall surface. This angle reveals imperfections that overhead lighting might conceal.
Texture and Final Finish Options
Drywall texture finishing can conceal minor imperfections while adding visual interest to wall surfaces. Choose textures based on your room's lighting conditions and desired maintenance level.
Common Texture Options:
Texture Type Application Method Maintenance Level
Orange Peel Spray gun Low
Knockdown Spray and scrape Medium
Skip Trowel Hand trowel Low
Smooth Skim coat only High
Apply primer before texture application to ensure proper adhesion and consistent appearance. Most textures require specific compound consistency for optimal results.
Professional drywall installation teams often recommend subtle textures for high-traffic areas. These finishes hide fingerprints and minor damage better than smooth surfaces.
Test texture patterns on sample boards before applying to finished walls. This allows you to adjust spray pressure, compound consistency, and application techniques.
Expert Drywall Repair and Patch Mudding
Professional repair work requires precise mudding techniques to restore damaged walls to their original condition. Different damage types demand specific approaches, from simple hole patches to complex water damage restoration.
Minor Drywall Patch Mudding
Small holes and dents require careful preparation before applying joint compound. You need to clean loose debris from the damaged area and ensure the surface is dry.
For nail holes and small dents, apply a thin layer of compound directly over the damage. Use a putty knife to smooth the surface level with the surrounding wall.
Medium holes (1-3 inches) require mesh patches or backing material:
- Clean the hole edges
- Apply self-adhesive mesh patch
- Cover with thin compound layer
- Allow to dry completely
- Apply second coat, feathering edges
- Sand smooth when dry
The mudding process typically needs 2-3 coats for seamless results. Each layer must dry 24 hours before applying the next coat.
Repairing Drywall Water Damage
Water damage creates complex repair challenges that require thorough assessment before mudding begins. You must first identify the moisture source and ensure complete drying.
Damaged areas often show these signs:
- Discoloration or staining
- Soft or crumbling drywall
- Bubbling paint or texture
- Mold growth
Cut out all compromised drywall material, extending beyond visible damage. The replacement piece should fit snugly against existing drywall edges.
Apply primer-sealer to water-stained areas before mudding to prevent bleed-through. Use multiple thin coats of joint compound rather than thick applications.
Blending the repair area requires extended feathering—often 12-18 inches beyond the patch edges for invisible results.
Mudding for Settlement and Cracks
Settlement cracks appear along joints, corners, and ceiling lines as buildings naturally shift. These repairs need flexible techniques to prevent recracking.
Preparation steps include:
- Remove loose compound or paint
- Widen hairline cracks slightly
- Apply mesh tape for reinforcement
- Prime bare drywall areas
Use setting-type compound for initial coats on settlement cracks. This compound hardens through chemical reaction rather than drying, creating stronger bonds.
Apply tape and compound in thin, even layers. Corner cracks require special attention—use corner bead replacement if damage is extensive.
Multiple coats ensure proper thickness and smooth transitions. Sand between coats using fine-grit paper to maintain level surfaces without creating scratches.
Specialized Drywall Solutions from Ironwood Drywall Richmond
Ironwood Drywall Richmond provides advanced drywall solutions beyond standard installation, including moisture-resistant materials for high-humidity areas and professional popcorn ceiling removal services. Their comprehensive approach combines specialized products with expert drywall installation and finishing techniques.
Moisture-Resistant and Sound-Dampening Drywall
Moisture-resistant drywall protects your home from humidity damage in bathrooms, kitchens, and basements. This specialized material contains water-repelling additives that prevent mold growth and structural deterioration.
You'll find green board and purple board options available for different moisture levels. Green board works well for moderate humidity areas like powder rooms.
Sound-dampening drywall reduces noise transmission between rooms using dense gypsum cores. These panels contain sound-absorbing fibers that minimize sound transfer by up to 10 decibels compared to standard drywall.
Installation requires specific drywall compound application techniques to maintain acoustic properties. Proper drywall seam finishing ensures no gaps compromise the sound barrier effectiveness.
Popcorn Ceiling Removal and Modern Upgrades
Popcorn ceiling removal transforms outdated textured ceilings into smooth, modern surfaces. This process involves careful scraping, surface preparation, and professional drywall finishing services in Richmond, BC.
The removal process includes:
- Testing for asbestos in older homes
- Protective plastic sheeting installation
- Wet scraping to minimize dust
- Surface repair and smoothing
After removal, you can choose from various drywall texture finishing options. Drywall level 5 finish provides the smoothest surface for premium paint applications.
Drywall sanding and multiple drywall mud layers create flawless results. The final drywall smooth finish requires expert drywall blending techniques.
Comprehensive Drywall Installation and Finishing Services
Drywall installation and finishing combines precise measuring, cutting, and mounting with professional mudding techniques. The drywall installation process begins with accurate measurements and proper fastener spacing.
Drywall taping and mudding involves three-coat application systems:
Coat Purpose Drying Time
First Embed tape 24 hours
Second Fill and smooth 24 hours
Third Final blend 24 hours
Drywall joint compound application requires different techniques for seams versus corners. Drywall corner mudding uses metal or paper beads for crisp edges.
Drywall surface preparation includes priming before texture or paint. Professional drywall coating ensures uniform absorption and color consistency across all surfaces.
