Hanging Drywall in Richmond, BC
Ironwood Drywall Richmond provides professional drywall hanging services for homeowners and businesses across Richmond, BC. From basement buildouts to full interior partitions, our team installs each sheet with the precision needed to support a flawless finish.
Poor installation can lead to uneven seams, weak joints, or sagging panels that compromise both appearance and durability. That’s why our installers rely on proper tools—like T-squares, screw guns, and accurate stud mapping—along with techniques that ensure every board is tight, level, and securely fastened. With careful layout, clean cuts, and consistent fastening patterns, we set your project up for trouble-free taping and long-term stability.
If you’re planning a renovation or new build, call 778-400-1950 to schedule your drywall hanging service. You can also learn more about our full installation process by visiting our
drywall installation services page.
Request A FREE Quote
Ironwood Drywall Richmond (HP)
Drywall Hanging Services in Richmond, BC
Professional drywall hanging in Richmond requires expertise in wall and ceiling installation, proper material selection, and precise framing preparation. These services encompass everything from residential renovations to commercial tenant improvements.
Overview of Hanging Drywall
Hanging drywall involves securing gypsum panels to wall and ceiling frames using screws or nails. This process requires precise measurements and proper spacing to ensure structural integrity.
Professional drywall installation begins with measuring your space and calculating material requirements. Installers mark stud locations and plan panel placement to minimize waste and joints.
Key hanging steps include:
- Measuring and cutting panels to fit
- Positioning boards against framing
- Securing with appropriate fasteners
- Creating clean, tight joints
Your drywall installer will use specialized tools like panel lifts for ceiling work and drywall saws for precise cuts. Proper technique prevents sagging, cracking, and joint failure.
Professional drywall services ensure code compliance and structural soundness. Experienced installers know local building requirements and moisture considerations specific to Richmond's climate.
Wall Hanging and Ceiling Hanging
Wall hanging typically starts from the top and works downward to create the strongest installation. Panels are positioned horizontally to reduce the number of joints requiring finishing.
Standard wall installation uses 1/2-inch drywall secured every 16 inches along studs. Screws should penetrate framing by at least 5/8 inch without breaking the paper surface.
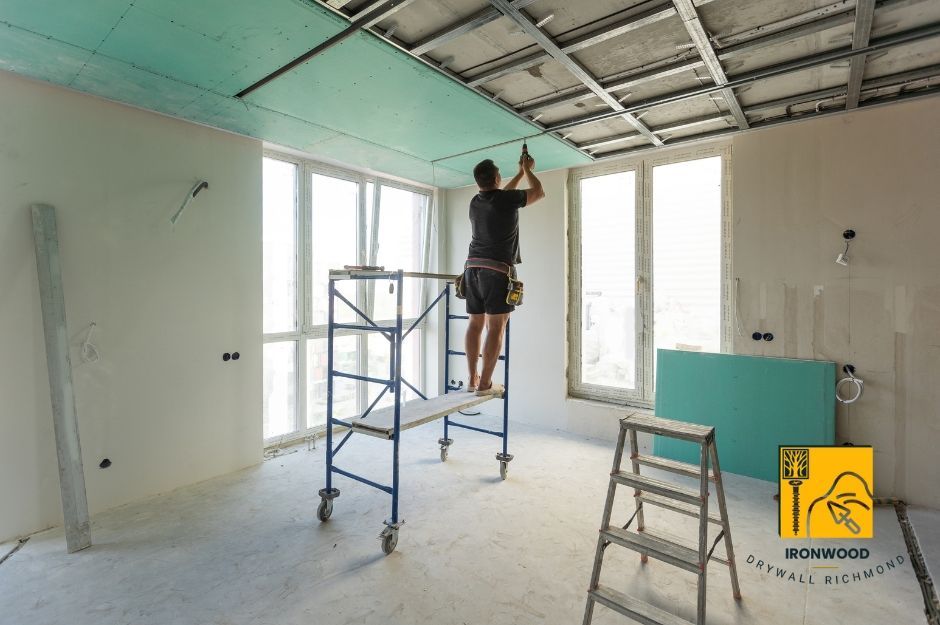
Ceiling hanging presents unique challenges due to gravity and access limitations. Professional installers use panel lifts or T-braces to support boards during fastening.
Ceiling installation considerations:
- Weight distribution across multiple joists
- Sagging prevention with proper fastener spacing
- Electrical integration around fixtures and outlets
Your installer will stagger joints between wall and ceiling panels to prevent cracking at corners. This technique distributes stress and creates stronger connections.
Interior partition hanging follows similar principles but may require different framing attachments depending on your structure type.
Types of Drywall and Sheetrock Used
Standard drywall comes in 1/2-inch and 5/8-inch thicknesses for different applications. The 1/2-inch version works well for most residential walls, while 5/8-inch provides better sound dampening.
Moisture-resistant drywall features green or purple paper facing for bathroom and kitchen installations. This material resists mold growth and maintains integrity in humid conditions.
Common panel sizes:
- 4x8 feet - Standard residential size
- 4x10 feet - Reduces joints in rooms with 9-foot ceilings
- 4x12 feet - Commercial applications and tall walls
Fire-rated drywall contains additives that slow flame spread and meet building code requirements for certain applications. Your contractor will specify the appropriate type based on your project needs.
Sheetrock is a brand name that has become synonymous with drywall. Professional installers work with various manufacturers to provide the best materials for your specific installation requirements.
Framing-Ready Install and Panel Hanging
Framing-ready install means your structure is prepared with proper stud spacing and electrical rough-in completed. Standard 16-inch or 24-inch stud centers provide adequate support for drywall board installation.
Your installer will verify framing quality before beginning panel hanging. Crooked or improperly spaced studs require correction to ensure flat, professional results.
Panel hanging techniques vary based on your project type. New construction allows for full-sheet installation, while renovation hanging may require more complex cutting and fitting.
Installation sequence typically follows:
- Ceiling panels installed first
- Upper wall panels positioned against ceiling
- Lower panels fitted to floor level
- Electrical boxes and fixtures cut precisely
Professional drywall services include basement hanging and full-home hanging projects. Each application requires specific moisture barriers and insulation considerations for Richmond's climate conditions.
Commercial hanging and tenant improvement hanging demand faster installation schedules and coordination with other trades. Experienced installers manage these complex projects efficiently while maintaining quality standards.
Specialized Drywall Installation Solutions
Ironwood Drywall Richmond provides targeted hanging solutions for residential properties, commercial buildings, tenant improvements, and complete home installations. Each project type requires specific techniques and materials to meet building codes and performance standards.
Residential Drywall Hanging
Your home's drywall installation requires precise measurements and seamless finishing. Residential hanging involves standard 1/2-inch panels for most interior walls and 5/8-inch fire-rated boards for garages and furnace rooms.
Key residential applications include:
- Living room and bedroom wall installation
- Kitchen and bathroom moisture-resistant hanging
- Basement ceiling and wall systems
- Interior partition creation
The hanging process begins with measuring and cutting panels to fit your room dimensions. Each sheet gets secured to wall studs using appropriate screws spaced 16 inches apart.
Your electrical outlets and switch boxes require careful cutting before panel installation. This prevents damage and ensures proper fit around existing fixtures.
Standard residential projects typically use tapered-edge panels for easier joint finishing. The installation follows local building codes for fire safety and structural requirements.
Commercial Drywall Hanging
Commercial projects demand fire-rated assemblies and enhanced durability standards. Your building's occupancy type determines specific panel thickness and installation requirements.
Commercial hanging specifications:
- 5/8-inch Type X panels for fire resistance
- Metal stud framing compatibility
- Acoustic performance considerations
- High-traffic area reinforcement
Office spaces require smooth wall surfaces for professional appearance. The hanging process accommodates HVAC systems, electrical conduits, and data cabling throughout the workspace.
Retail environments need impact-resistant installation in customer areas. This involves strategic panel placement and additional fastening in high-contact zones.
Your commercial project timeline requires coordinated scheduling with other trades. The installation team works efficiently to meet construction deadlines while maintaining quality standards.
Tenant Improvement Hanging
Your tenant improvement project involves modifying existing commercial space for new occupants. This specialized hanging addresses partition changes, layout modifications, and code compliance updates.
TI hanging considerations:
- Existing ceiling integration
- HVAC modification accommodation
- Fire separation requirements
- Quick installation timelines
Demising walls between tenant spaces require fire-rated assemblies. The installation must meet building codes for sound transmission and fire protection between units.
Your space reconfiguration often involves removing existing partitions before new panel installation. This process requires careful planning to avoid structural or utility damage.
Restaurant and medical tenant improvements need specialized moisture and impact-resistant panels. The hanging process accommodates unique fixtures and equipment mounting requirements.
Full-Home and Basement Hanging
Complete home installations provide consistent quality throughout all living areas. Your new construction or major renovation requires systematic panel hanging from foundation to roof line.
Full-home hanging process:
- Sequential room completion
- Consistent joint placement
- Utility coordination
- Quality control checkpoints
Basement installations require moisture-resistant panels and proper vapor barrier placement. The hanging process addresses foundation irregularities and low ceiling challenges.
Your basement finishing involves insulation coordination before panel installation. This ensures proper thermal performance and prevents condensation issues.
Multi-story homes need coordinated hanging schedules to maintain workflow efficiency. The installation team completes upper floors before moving to main and basement levels.
Contact Ironwood Drywall Richmond at 778-400-1950 for specialized hanging solutions tailored to your specific project requirements.
Quality Assurance and Finishing Services
Professional drywall installation requires precise board placement, specialized renovation techniques for existing structures, and systematic approaches to interior partitions. These processes culminate in expert taping and seam finishing that creates smooth, paint-ready surfaces.
Drywall Board Installation Process
Proper board installation begins with accurate measurements and cuts tailored to your specific room dimensions. Each panel must align perfectly with framing members to ensure structural integrity and prevent future cracking.
Installation Steps:
- Measure and mark cutting lines on drywall sheets
- Use appropriate cutting tools for clean, precise edges
- Position boards with minimal gaps between panels
- Secure with screws placed 8-12 inches apart on studs
- Maintain consistent screw depth below surface level
Your installer checks each panel for proper attachment before moving to the next section. Corner installations require special attention to ensure square alignment and tight joints.
Quality control involves inspecting every fastener placement and board position. Any loose panels or protruding screws receive immediate correction to prevent future drywall repairs.
Renovation Hanging Techniques
Renovation projects demand specialized approaches when working around existing structures, electrical systems, and plumbing fixtures. Your contractor must navigate obstacles while maintaining professional installation standards.
Key Renovation Considerations:
- Working around existing electrical outlets and switches
- Fitting panels against irregular ceiling heights
- Accommodating HVAC vents and fixtures
- Managing dust control in occupied spaces
Partial wall replacement requires careful matching of existing drywall thickness. New panels must align flush with surrounding surfaces to avoid visible transitions after finishing.
Template cutting becomes essential for precise fits around complex shapes. Your installer creates cardboard templates for intricate cuts around pipes, electrical boxes, and architectural features.
Interior Partition Hanging
Interior partition installation creates new room divisions and enhances your home's functionality. These installations require coordination with framing work and consideration of load-bearing requirements.
Partition Installation Process:
- Verify framing alignment and spacing
- Install ceiling panels first when applicable
- Hang wall panels with tight vertical joints
- Ensure proper clearance at floor level
Sound control becomes important for bedroom and bathroom partitions. Your installer may recommend specific board types or installation techniques to reduce noise transmission between rooms.
Doorway framing requires precise measurements to accommodate future trim installation. Panels must align perfectly with door frame edges for professional finishing results.
Drywall Taping and Seam Finishing
Professional drywall taping transforms individual panels into seamless wall surfaces ready for paint or texture application. This multi-step process requires specialized compounds and tools.
Finishing Stages:
- First coat: Embed tape in compound over all seams
- Second coat: Widen coverage and smooth ridges
- Final coat: Feather edges for invisible transitions
Your finisher applies compound in thin, even layers to prevent shrinkage cracks. Each coat must dry completely before sanding and applying subsequent layers.
Corner beads protect outside corners from damage while creating crisp, straight lines. Inside corners receive paper or mesh tape for flexible, crack-resistant joints.
Screw holes receive three separate compound applications. Proper filling prevents visible fastener marks after painting your finished walls.
Enhancements and Additional Services
Beyond standard hanging services, modern drywall projects often require specialized solutions like outdated texture removal, enhanced acoustic properties, and comprehensive repair work. These complementary services ensure your Richmond property meets current standards while addressing common issues found in older buildings.
Popcorn Ceiling Removal
Popcorn ceiling removal transforms dated interiors into modern, smooth surfaces. This textured finish was popular from the 1960s through 1980s but now appears outdated and can harbor dust and allergens.
The removal process involves careful scraping and surface preparation. Your contractor will protect floors and furniture with plastic sheeting before beginning work. Water is typically sprayed onto small sections to soften the texture for easier removal.
Safety considerations are critical during this process. Homes built before 1980 may contain asbestos in the popcorn texture. Professional testing determines whether special handling procedures are required.
After removal, the ceiling surface requires skim coating and sanding. This creates a perfectly smooth base for primer and paint application. The entire process typically takes 2-3 days for an average room.
Soundproofing and Insulation Options
Sound control becomes increasingly important in modern residential and commercial spaces. Strategic insulation placement during drywall hanging significantly reduces noise transmission between rooms.
Acoustic insulation materials include:
- Mineral wool batts
- Fiberglass with sound-dampening properties
- Mass loaded vinyl barriers
- Resilient channel systems
Double-layer drywall installation provides additional sound reduction. The first layer attaches directly to studs, while the second layer offsets joints for maximum effectiveness.
Thermal insulation improves energy efficiency alongside acoustic benefits. Proper installation prevents air gaps that reduce performance. Your contractor coordinates with insulation specialists to ensure complete coverage before hanging drywall panels.
Commercial spaces often require specific sound ratings. Professional installation ensures compliance with building codes and tenant requirements.
Drywall Repair and Restoration
Existing drywall frequently requires attention before new installations can proceed. Water damage, settling cracks, and impact holes need professional assessment and repair.
Common drywall repairs include:
- Nail pop corrections
- Tape joint failures
- Water stain treatment
- Hole patching and reinforcement
Water-damaged areas require complete moisture removal before repairs begin. Affected sections may need full replacement rather than surface patching. Your contractor identifies the extent of damage through moisture testing.
Texture matching ensures seamless integration between old and new surfaces. This process requires skill to blend repair areas with surrounding wall textures.
Large repair projects often coordinate with hanging new drywall in adjacent areas. This approach provides consistent results across your entire renovation project.
Can a beginner hang drywall?
While there are a lot of step-by-step DIY drywall guides out there claiming to make hanging drywall easy, it is not a good idea for a beginner to attempt a project without professional help. Small mistakes can be costly and could lead to bigger structural problems.
How far apart should the screws be when hanging drywall?
The maximum distance between screws should be 16 inches across drywall fields (the main area of the panel). This maximum decreases to just eight inches when working on wall edges. This helps ensure a solid foundation for the rest of your project.
What is the number one tool when hanging drywall?
You need more than one tool to professionally install drywall. Proper screws are arguably the most important element, but the job simply won't work without all the proper gear. Some examples include a drywall T-square, a utility knife, and a drill.
Buying or hiring all the necessary equipment can be expensive. As well as having the proper tools, you need to know how to use them. Overall, it is far more practical and productive to hire professionals to do it for you.
When hanging drywall, do you start with the ceiling?
In most cases, it is best to start drywalling the ceiling before the walls. It is easier to align the joints and ensure a tight fit if the ceiling drywall is in place first, and it is a more practical way to work with trick materials.
